Recommended Posts
- Get link
- X
- Other Apps
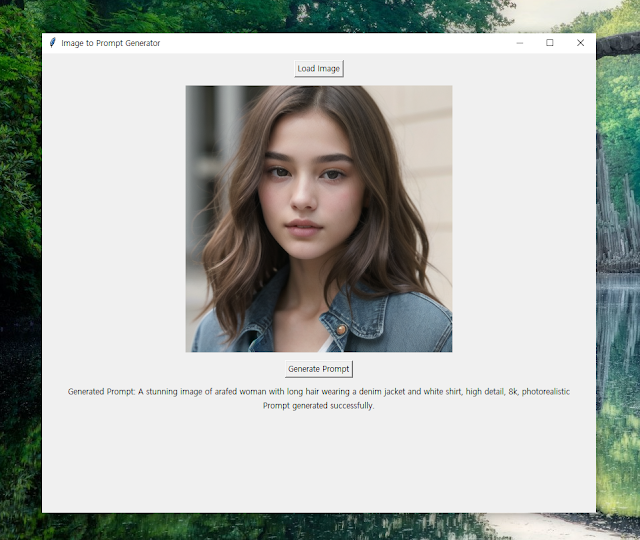
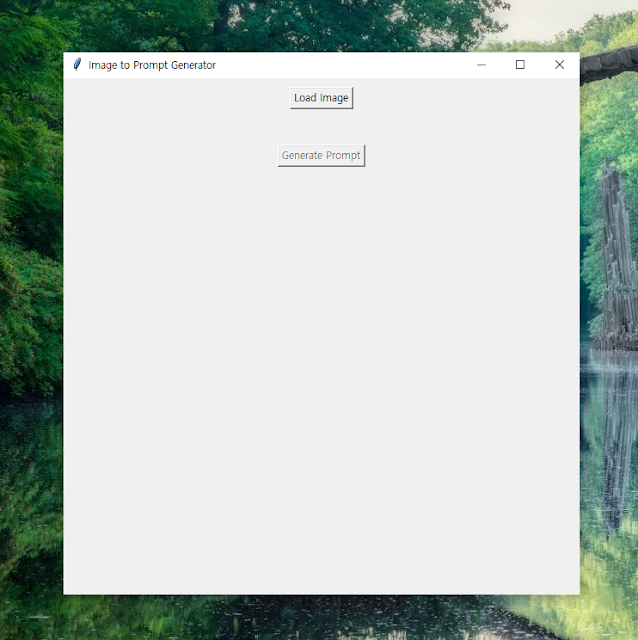
Let's create a Python GUI application that generates prompts from images, with a resizable window. This will cover installation, code, and detailed explanations.
1. Core Technologies & Libraries & Installation
- Tkinter: Python's standard GUI library. Usually pre-installed. If not: pip install tk
- Pillow (PIL): Image processing. pip install Pillow
- Transformers: Access to pre-trained models. pip install transformers
- Image Captioning Model: We'll use Salesforce/blip-image-captioning-large. This will be downloaded automatically by transformers the first time you run the code.
- Optional (but recommended): torch (PyTorch). Transformers often uses PyTorch as a backend.
pip install torch torchvision torchaudio
(Check the PyTorch website https://pytorch.org/ for specific installation
instructions based on your system and CUDA availability).
2. Code Title: ImagePromptGeneratorGUI.py
import tkinter as tk
from tkinter import filedialog
from PIL import Image, ImageTk
from transformers import pipeline
import torch  # Import PyTorch

class ImagePromptGenerator:
    def __init__(self, master):
        self.master = master
        master.title("Image to Prompt Generator")

        self.image_path = None
        self.prompt = None

        # UI Elements
        self.load_button = tk.Button(master, text="Load Image", command=self.load_image)
        self.load_button.pack(pady=10)

        self.image_label = tk.Label(master)
        self.image_label.pack()

        self.generate_button = tk.Button(master, text="Generate Prompt", command=self.generate_prompt, state=tk.DISABLED)
        self.generate_button.pack(pady=10)

        self.prompt_label = tk.Label(master, text="")
        self.prompt_label.pack()

        self.status_label = tk.Label(master, text="")
        self.status_label.pack()

        # Initialize the image captioning pipeline.  Specify device here.
        device = "cuda:0" if torch.cuda.is_available() else "cpu"
        self.image_to_text = pipeline("image-to-text", model="Salesforce/blip-image-captioning-large", device=device)


    def load_image(self):
        self.image_path = filedialog.askopenfilename(filetypes=[("Image files", "*.png;*.jpg;*.jpeg")])
        if self.image_path:
            self.status_label.config(text="Image loaded.")
            self.generate_button.config(state=tk.NORMAL)

            img = Image.open(self.image_path)
            img.thumbnail((400, 400))  # Resize for display
            photo = ImageTk.PhotoImage(img)
            self.image_label.config(image=photo)
            self.image_label.image = photo  # Keep a reference!

    def generate_prompt(self):
        if not self.image_path:
            self.status_label.config(text="No image loaded.")
            return

        self.status_label.config(text="Generating prompt...")
        self.master.update()

        try:
            caption = self.image_to_text(self.image_path)[0]['generated_text']
            self.prompt = f"A stunning image of {caption}, high detail, 8k, photorealistic" #Improved prompt
            self.prompt_label.config(text=f"Generated Prompt: {self.prompt}")
            self.status_label.config(text="Prompt generated successfully.")

        except Exception as e:
            self.status_label.config(text=f"Error generating prompt: {e}")
            self.prompt_label.config(text="")

root = tk.Tk()
root.geometry("600x600") #Initial window size
root.resizable(True, True) #Allow resizing
gui = ImagePromptGenerator(root)
root.mainloop()
3. Detailed Explanation
- Imports: Same as before, plus import torch for GPU availability check.
- ImagePromptGenerator Class:
- __init__(self, master):
- Initializes the GUI elements.
- self.image_to_text = pipeline(...): Creates the image captioning pipeline.
- if torch.cuda.is_available(): self.image_to_text.to("cuda"):
Crucial: This checks if a CUDA-enabled GPU is available.
If it is, the model is moved to the GPU using .to("cuda"). This significantly speeds up the prompt generation process. If you don't have a GPU or CUDA installed, this line will be skipped, and the model will run on the CPU.
- load_image(self): Loads the image, resizes it, and displays it.
- generate_prompt(self): Generates the prompt using the image captioning pipeline. The prompt is now slightly improved with "photorealistic".
- __init__(self, master):
- Main Execution Block:
- root = tk.Tk(): Creates the main window.
- root.geometry("600x600"): Sets the initial size of the window to 600x600 pixels.
- root.resizable(True, True): Important: This line enables resizing of the window in both the horizontal and vertical directions.
- gui = ImagePromptGenerator(root): Creates an instance of
the ImagePromptGenerator class. - root.mainloop(): Starts the Tkinter event loop.
4. Essential Considerations & Improvements
- GPU Usage: Using a GPU is highly recommended for faster prompt generation, especially with larger models. Make sure you have a CUDA-enabled
GPU and that PyTorch is configured to use it correctly. - Error Handling: The try...except block catches general exceptions. You could add more specific error handling to handle different types of errors (e.g., file not found, model loading error).
- Prompt Engineering: Experiment with different prompt templates and keywords to get the best results for your specific image generation model. Consider adding options for style selection, quality settings, and negative prompts.
- Threading: For very large images or complex models, the prompt generation process might take a long time. Consider running the generate_prompt function in a separate thread to prevent the GUI from freezing. Use threading.Thread for this.
- Progress Bar: Add a progress bar to provide visual feedback to the user during the prompt generation process.
- Model Selection: Allow the user to choose from different image captioning models.
- GUI Layout: Use Tkinter's layout managers (grid, pack, place) to create a more visually appealing and organized GUI.
- Clearer Status Messages: Provide more informative status messages to the user.
- Image Format Support: Expand the filetypes list in filedialog.askopenfilename to support more image formats.
Required Instructions
Running this code will automatically download the model and require GPU usage.
Here is an example PyTorch installation prompt for CUDA use:
pip install torch torchvision torchaudio
pip install torch torchvision torchaudio --extra-index-url https://download.pytorch.org/whl/cu113
pip install torch torchvision torchaudio --extra-index-url https://download.pytorch.org/whl/cu118
pip install torch torchvision torchaudio --extra-index-url https://download.pytorch.org/whl/cu121
pip install torch torchvision torchaudio --extra-index-url https://download.pytorch.org/whl/cu124
pip install torch torchvision torchaudio --extra-index-url https://download.pytorch.org/whl/cu128
You must install the CUDA version that corresponds to your GPU. Refer to the NVIDIA graphics card driver installation homepage.
This comprehensive example provides a solid foundation for building a more advanced image-to-prompt generator GUI. Remember to adapt the code and features to your specific needs and preferences.


Comments
Post a Comment