Recommended Posts
- Get link
- X
- Other Apps
Image Representation & Manipulation with NumPy and a Simple GUI
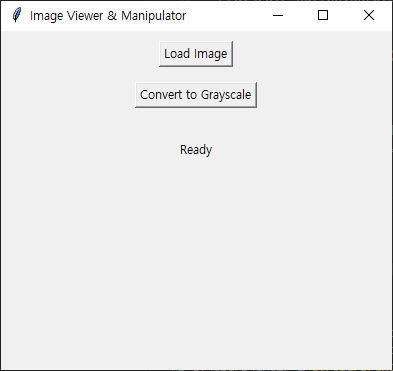
This example demonstrates basic image representation and manipulation using NumPy and a simple graphical user interface (GUI) created with Tkinter. The GUI allows loading an image, displaying it, and applying a simple grayscale conversion filter.
image_manipulator.py
import tkinter as tk
from tkinter import filedialog
from PIL import Image, ImageTk
import numpy as np

def load_image():
    global img, img_tk
    file_path = filedialog.askopenfilename(filetypes=[("Image files", "*.png;*.jpg;*.jpeg")])
    if file_path:
        try:
            img = Image.open(file_path)
            img_tk = ImageTk.PhotoImage(img)
            image_label.config(image=img_tk)
            image_label.image = img_tk  # Keep a reference!
        except Exception as e:
            status_label.config(text=f"Error loading image: {e}")

def convert_to_grayscale():
    global img, img_tk
    if img:
        img_array = np.array(img)
        # Convert to grayscale using a weighted average
        grayscale_array = np.dot(img_array[...,:3], [0.2989, 0.5870, 0.1140])
        grayscale_img = Image.fromarray(grayscale_array.astype(np.uint8))
        img_tk = ImageTk.PhotoImage(grayscale_img)
        image_label.config(image=img_tk)
        image_label.image = img_tk  # Keep a reference!
        status_label.config(text="Image converted to grayscale.")
    else:
        status_label.config(text="No image loaded.")

# Create the main window
root = tk.Tk()
root.title("Image Viewer & Manipulator")

# Load Image Button
load_button = tk.Button(root, text="Load Image", command=load_image)
load_button.pack(pady=10)

# Grayscale Button
grayscale_button = tk.Button(root, text="Convert to Grayscale", command=convert_to_grayscale)
grayscale_button.pack(pady=5)

# Image Label
image_label = tk.Label(root)
image_label.pack()

# Status Label
status_label = tk.Label(root, text="Ready")
status_label.pack(pady=5)

# Run the GUI
root.mainloop()
2. How to Run the Code:
pip install Pillow tkinter numpy
- 2Save the Code: Save the code as a Python file (e.g., image_manipulator.py).
- Run the Script: Execute the script from your terminal:'
python image_manipulator.py
A window will appear with "Load Image" and "Convert to Grayscale" buttons.
3. Source Code Explanation:
- Import Libraries: The code imports tkinter for the GUI, filedialog for opening files, PIL (Pillow) for image handling, and numpy for array manipulation.
- load_image() Function: This function opens a file dialog to allow the user to select an image. It then loads the image using Image.open(), converts it to a Tkinter-compatible format using ImageTk.PhotoImage(), and displays it in the image_label. Error handling is included to catch potential issues during image loading. Crucially, image_label.image = img_tk keeps a reference to the img_tk object; without this, Tkinter's garbage collection might discard the image, causing it not to display.
- convert_to_grayscale() Function: This function converts the loaded image to grayscale. It first converts the image to a NumPy array using np.array(). Then, it applies a weighted average to the red, green, and blue channels to calculate the grayscale value for each pixel. The resulting grayscale array is converted back to an image using Image.fromarray(). Finally, the grayscale image is displayed in the image_label.
- GUI Creation: The code creates the main window (root), buttons for loading and converting images, an image label (image_label) to display the image, and a status label (status_label) to provide feedback to the user.
- Button Commands: The command attribute of each button is set to the corresponding function (load_image or convert_to_grayscale).
- root.mainloop(): This starts the Tkinter event loop, which listens for user interactions and updates the GUI accordingly.
4. Additional Notes & Potential Extensions:
- Image Formats: The code currently supports PNG, JPG, and JPEG images. You can extend it to support other image formats by modifying the filetypes parameter in filedialog.askopenfilename().
- More Filters: You can add more image filters, such as brightness adjustment, contrast enhancement, or edge detection, by implementing additional functions that manipulate the NumPy array representing the image.
- Error Handling: The error handling in the load_image() function is basic. You can improve it by providing more specific error messages and handling different types of exceptions.
- User Interface: The GUI is very simple. You can enhance it by adding more features, such as a menu bar, a toolbar, or a preview of the grayscale image before applying the filter.
- Real-time Manipulation: For more advanced image manipulation, you could explore libraries like OpenCV, which provide optimized functions for image processing.
- Saving Images: Add functionality to save the modified images to a file.
- Zooming and Panning: Implement zooming and panning functionality for the image display.
- Color Space Conversions: Explore other color space conversions beyond grayscale (e.g., HSV, YCbCr).

Comments
Post a Comment